Pages

Sunday, November 29, 2020

Using nomad to deploy/manage containers (on a mostly IPv6 network)

Overview

This blog will show an overview of our container deployment using Nomad and IPv6-(only) where possible.

The focus for this setup was to empower developers and keeping things simple for them and us (the admins).
They can configure firewalls, storage, traefik, internet accessibility and more and have an https enabled project running in minutes.

As we run our own physical datacenters we have the luxury to use IPv6 where we want/can and do not need the mess of overlay networks and NAT.


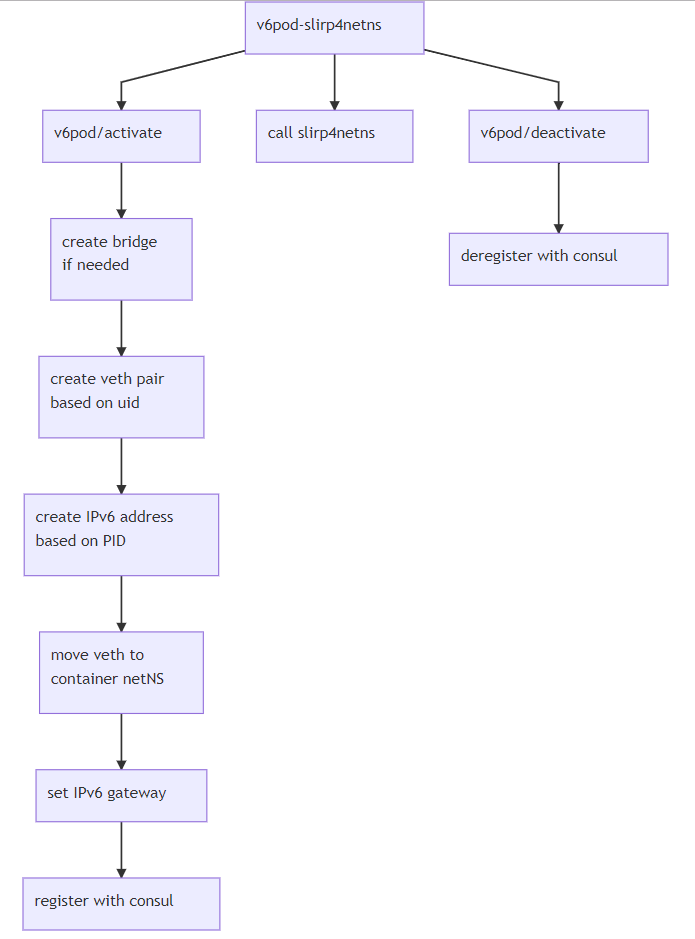
Our developers create a nomadjob using a nomadgen.toml file which simplifies the nomad hcl plans (and extends it with features nomad itself cannot do).
You can find an example below. Most of the lines are self explanatory, i've added some comments


This nomadgen.toml gets checked into gitea, where Jenkins will pick it up and send it to nomadguard.

Nomadguard will:

  • turn the toml back into a complete hcl with all of our infrastructure parameters filled in.
  • run our nomad validator on it which checks if the user specified correct settings, uses the correct namespace and authorizations etc.
  • runs nomad modifier on it, which allows us to modify jobs to automatically scale multi-containers over our 2 datacenters, move on specific nodes, limit memory, cpu or other things we need to do without developer interaction.

This modified nomad job will then get deployed to the nomad scheduler which will send it to a nomad node that has the resources the developer asked for.

On that nomad node the nomad agent will contact vault to resolve any needed secrets and it will start the docker container. At startup the incoming and outgoing firewall for that container will be configured. As we're using IPv6 our containers are routable and direct accessible, so we need to have a firewall in place for that. We use a modified registrator to add specific ipset entries to allow access to or from the container.

At the same time nomad will also register it's IPv6 addresses in our consul DNS (so traefik can start sending traffic to it).

If the container is running a http/https service this will be automatically exposed on https://p-es-cerebro.cloud.internal.domain (where p is the first letter of the tier (production/quality/test))

All of this infrastructure around the containers is IPv6 only and the containers themselves only allow IPv6 ingress, but they do have dualstack egress as some of the services they need (on the inter- or intranet) are not dualstack yet.

At the edge we have a netscaler that talks dualstack (IPv4/IPv6) to the users and moves to IPv6 only when talking to traefik and containers.

We're using default docker from Centos 7 and every nomad node is getting a IPv6 /80 range routed which it can use to give the containers their ipv6 addresses.

Extra tooling

We have some more tooling available for developers as they need to debug their deployments. This is where we have nomadctl which allows them to ask information about their job, see logs (coming from elasticsearch) and enter containers.

$ nomadctl ps cerebro
Exec ID    |Job/Task        |Node          |Uptime     |CPU |Mem(max)         |Extra
           |p-es-cerebro OK |              |           |    |                 |
c4996e3c72 |p-es-cerebro    |p-cloud-dc1-9 |3 days ago |26  |948 MiB(1.2 GiB) |
59702e6d47 |p-es-cerebro    |p-cloud-dc2-8 |3 days ago |27  |872 MiB(1.1 GiB) |

Or exec into a container

$ nomadctl exec c4996e3c72
Welcome wim (ssh cert verified)
welcome to p-es-cerebro on p-cloud-dc1-9
# ss -an | grep 9000
tcp    LISTEN     0      100                          :::9000                                     :::*

Issues

Of course there were issues, but not that many ;-)

  • Especially in the early days of our setup we had some IPv6 issues in the hashicorp tools, but as they are opensource it's easy to fix those. (in contrast to hardware vendors where bugs are ignored or takes years to fix ..)
  • Nomad 0.8 to 0.9 was troublesome because a lot of nomad stuff internally was rewritten and caused some issues in our setup.

The main takeaway after 5 years is that the nomad/consul/vault infrastructure is really solid and needs no babysitting.
And yes, IPv6 is (mostly) ready for production!


Saturday, March 30, 2019

Routable IPv6 containers with podman

Hacking podman to have "rootless" routable ipv6 containers using a small root daemon.


Podman is great, but to have it replace our current docker setup it also needs ipv6 support (which it has using slirp4netns), but this isn't reachable from other containers or outside the host.

We don't care about incoming legacy IP (ipv4).


What do we want

When a user starts a container, the container should have a routable IPV6 address and register it's name in consul. That way we can have multiple containers talk to eachother, no matter from which host they're started. (and this all needs to work on centos 7.6)


What do we need


From podman

  • The id of the user that started the container
  • The PID of the container so we can use this to enter the same network namespace
  • The name of the container so we can register this in consul
  • A way to talk to v6pod

External to podman (v6pod will handle this)

  • Be compatible with our current docker IPv6 ranges (/80)
  • Creating a bridge and add the gateway IPv6 address to it (::1)
  • Creating a veth pair
  • Generate a (dynamic) IPv6 address in the /80 range and add to veth that will come into the container
  • Add one of the veths to the bridge, the other in the network namespace of the user
  • Add a default IPv6 route to the bridge
  • Register the name of the container to the generated IPv6 address in consul
  • Deregister the name when the container stops

Modifying libpod/podman

1) Executing user

Some investigation into what happens when running podman run (rootless)
Podman tries to create a user namespace, join this and become root in it and re-executes itself in that namespace.
We need to save the id of the executing user somewhere, the environment looks a good place.
So we create a v6pod_user variable which contains the userid of the user running podman.


2) Pid of the container

This could be added somewhere better probably, but I kept it in the same method.
We don't have access to the container PID yet there because it hasn't started, but we already have the container ID that will be used.
So I save the container ID in the v6pod_id environment variable.
v6pod will then look into /run/user/" + userID + "/runc/" + containerID + "/state.json file to get the PID

Overview below of what happens when podman runs executes again but now in the user namespace.


3) Name of the container

We could've set this using another variable, but to be more flexible (maybe we need more information about the container in the future) we choose not to.
Podman saves it create-config in the path: "/run/user/" + userID + "/libpod/tmp/socket/" + containerID + "/artifacts/create-config" which contains a lot information and also the container name.

4) Talk with v6pod

Here we just hijack the slirp4netns command (which enables userspace networking) and replace it with a v6pod-slirp4netns bash file which contains:

#!/bin/bash
/bin/curl -XPOST -d "user=$v6pod_user&id=$v6pod_id" http://localhost:6781/api/activate
/bin/slirp4netns "$@"
/bin/curl -XPOST -d "user=$v6pod_user&id=$v6pod_id" http://localhost:6781/api/deactivate


So we use the variables we set above to do all the networking stuff we need, then let slirp4netns do it setup so we still have outgoing IPv4 besides IPv6. When the container ends, slirp4netns exists and we do a deregistration.


Modifying slirp4netns

slirp4netns sets an ipv4 and ipv6 address and gateways. We do the IPv6 part now, so this needs to be disabled in slirp4netns.

v6pod

v6pod is a go daemon with a rest interface that has a /activate and /deactivate entrypoint.
It implements the requirements of above:
  • Be compatible with our current docker IPv6 ranges (/80)
  • Creating a bridge and add the gateway IPv6 address to it (::1)
  • Creating a veth pair
  • Generate a (dynamic) IPv6 address in the /80 range and add to veth that will come into the container
  • Add one of the veths to the bridge, the other in the network namespace of the user
  • Add a default IPv6 route to the bridge
  • Register the name of the container to the generated IPv6 address in consul
  • Deregister the name when the container stops

Saturday, October 20, 2018

Buildah inside a centos 7.5 docker container on a centos 7.5 host

Our current solution uses Jenkins to start a Nomad job which starts a (unprivileged) docker container in which a developers Dockerfile is being build (as root) using the docker on the host.

The goal is to replace the docker build in the container by buildah so that we don't need to make the docker on the host available inside the container.

The path to this wasn't as straightforward unfortunately, a lot of yaks needed shaving.

Start of the journey

We're starting with a basic container where we install buildah in
# docker run --rm -ti centos:7 /bin/bash
[root@7387c68139dd /]# yum -y install buildah
And a very simple Dockerfile
FROM centos:7
RUN uptime

Yak 1 - overlay problems

Out of the box running buildah in the container will give an overlay error.
# buildah bud -t test .
ERRO[0000] 'overlay' is not supported over extfs at "/var/lib/containers/storage/overlay"
kernel does not support overlay fs: 'overlay' is not supported over extfs at "/var/lib/containers/storage/overlay": backing file system is unsupported for this graph driver
Spoiler: The real reason this doesn't work is because it tries to do a mount call, which can only be done with the SYS_ADMIN capability (or in a privileged container).

Using --storage-driver vfs fixed this problem.

On to the next one.

Yak 2 - mount namespace error aka unshare(CLONE_NEWNS) permission aka the wrong yak

Spoiler: this yak is a red herring
# buildah --storage-driver vfs bud -t test .
STEP 1: FROM centos:7
Getting image source signatures
Copying blob sha256:aeb7866da422acc7e93dcf7323f38d7646f6269af33bcdb6647f2094fc4b3bf7
 71.24 MiB / 71.24 MiB [====================================================] 4s
Copying config sha256:75835a67d1341bdc7f4cc4ed9fa1631a7d7b6998e9327272afea342d90c4ab6d
 2.13 KiB / 2.13 KiB [======================================================] 0s
Writing manifest to image destination
Storing signatures
STEP 2: RUN uptime
error running container: error creating new mount namespace for [/bin/sh -c uptime]: operation not permitted
error building at step {Env:[PATH=/usr/local/sbin:/usr/local/bin:/usr/sbin:/usr/bin:/sbin:/bin] Command:run Args:[uptime] Flags:[] Attrs:map[] Message:RUN uptime Original:RUN uptime}: exit status 1
strace to the rescue
unshare(CLONE_NEWNS)              = -1 EPERM (Operation not permitted)
After some googling I found that centos/rhel kernels have user namespace disabled by default and need to have a kernel parameter set to get this working.
We can enable this by running on the host
sudo grubby --args="namespace.unpriv_enable=1 user_namespace.enable=1" --update-kernel="$(grubby --default-kernel)"
And also set the maximum number of user namespaces that any user in the current user namespace may create by running
echo "user.max_user_namespaces=15000" >> /etc/sysctl.conf
Now we can reboot the server
And come to the conclusion that it still doesn't work.

Yak 3 - outdated buildah version

Thanks to the #buildah channel on freenode, I found out that the problem of yak 2 was actually an outdated buildah version.
Centos has only a buildah 1.2 rpm, but 1.4 or higher was needed so I'd have to build my own.

You can have this pleasure too with the following script containing a modified RPM spec.

Run a new centos:7 container
# docker run -ti -v /tmp:/tmp centos:7 /bin/bash
and run following commands in the container:
yum -y group install development
yum -y install wget
cd /root/rpmbuild/SOURCES
wget "https://github.com/containers/buildah/tarball/608fa843cce45e7ee58ccb71a90297b645a984d3" -O buildah-608fa84.tar.gz
tar zxvf buildah-608fa84.tar.gz
mv containers-buildah-608fa84 buildah-608fa843cce45e7ee58ccb71a90297b645a984d3 
tar zcvf buildah-608fa84.tar.gz buildah-608fa843cce45e7ee58ccb71a90297b645a984d3
rm -rf buildah-608fa843cce45e7ee58ccb71a90297b645a984d3
cd ../SPECS
wget https://gist.githubusercontent.com/42wim/848fba2ed2d64d457f56eeebef0e85a2/raw/bb3ad3c524529ed921626fb077b8ff78a56783fc/buildah.spec -O buildah.spec
yum-builddep -y buildah.spec
rpmbuild -ba buildah.spec
This will give you your RPMs
Wrote: /root/rpmbuild/SRPMS/buildah-1.4-1.git608fa84.el7.centos.src.rpm
Wrote: /root/rpmbuild/RPMS/x86_64/buildah-1.4-1.git608fa84.el7.centos.x86_64.rpm
Wrote: /root/rpmbuild/RPMS/x86_64/buildah-debuginfo-1.4-1.git608fa84.el7.centos.x86_64.rpm

Yak 4 - proc mount error

Progress, a new error when running buildah 1.4!
# buildah --storage-driver vfs bud -t test .
STEP 1: FROM centos:7
Getting image source signatures
Copying blob sha256:205941c9c2d103bcdff0bc72d8836e0ffc4573ec0e6e524ec1a59606062a289f
 71.25 MiB / 71.25 MiB [====================================================] 4s
Copying config sha256:e26dc8af6a3b1856b9f4a893d5b51855c02dfe3b9cec58a4e55002036528c669
 2.14 KiB / 2.14 KiB [======================================================] 0s
Writing manifest to image destination
Storing signatures
STEP 2: RUN uptime
container_linux.go:336: starting container process caused "process_linux.go:399: container init caused \"rootfs_linux.go:58: mounting \\\"/proc\\\" to rootfs \\\"/tmp/buildah596035765/mnt/rootfs\\\" at \\\"/proc\\\" caused \\\"operation not permitted\\\"\""
error running container: error creating container for [/bin/sh -c uptime]: : exit status 1
error building at step {Env:[PATH=/usr/local/sbin:/usr/local/bin:/usr/sbin:/usr/bin:/sbin:/bin] Command:run Args:[uptime] Flags:[] Attrs:map[] Message:RUN uptime Original:RUN uptime}: exit status 1
ERRO[0012] exit status 1
Again thanks to #buildah channel, I found out that running --isolation chroot would solve it.

Victory!

Finally it works, we have an image created by buildah running in an unprivileged container.
# buildah --storage-driver vfs bud --isolation chroot -t test .
STEP 1: FROM centos:7
STEP 2: RUN uptime
 21:30:55 up 32 min,  0 users,  load average: 0.39, 0.12, 0.08
STEP 3: COMMIT containers-storage:[vfs@/var/lib/containers/storage+/var/run/containers/storage]localhost/test:latest
Getting image source signatures
Skipping fetch of repeat blob sha256:f972d139738dfcd1519fd2461815651336ee25a8b54c358834c50af094bb262f
Skipping fetch of repeat blob sha256:4f4fb700ef54461cfa02571ae0db9a0dc1e0cdb5577484a6d75e68dc38e8acc1
Copying config sha256:26e3b2177f9e9db1bdc8f49083d09dbb980a99ed4e606f4dc45b79ca865588ce
 1.17 KiB / 1.17 KiB [======================================================] 0s
Writing manifest to image destination
Storing signatures
--> 26e3b2177f9e9db1bdc8f49083d09dbb980a99ed4e606f4dc45b79ca865588ce
But after testing a new yak appears.

Yak 5 - a lot of diskspace

This one is related to yak 1, because we're using the vfs storage driver, it uses the disk not very space efficient (according to https://docs.docker.com/storage/storagedriver/vfs-driver/) a more complicated docker build uses gigabytes of disk when using the vfs storage driver compared to the overlay driver.

To run with the overlay driver we need access to the mount call which means we have to run our docker container with CAP_SYS_ADMIN which is unfortunate.

# docker run --rm --add-cap SYS_ADMIN -ti centos:7 /bin/bash

Conclusion

It's possible to run buildah in an unprivileged container but only using the vfs storage driver, but beware of the disk usage when building images!

Interesting links:

Monday, September 28, 2015

How to create an IPv6-only consul cluster with docker

Why?

  • we're using docker to run consul (and registrator and our services) in, and IPv6 makes this easier (no NAT => better performance)
  • it's easier to maintain one stack
  • consul is known to give issues with NAT and docker (https://github.com/docker/docker/issues/8795)
  • IPv4 is legacy and obsolete ;-)
Consul 0.5.2 has some issues running such a setup, but if you're building consul from master (which includes some fixes (see https://github.com/hashicorp/consul/commits?author=42wim) it will work fine.

Issues to be aware of:

  • the IPv4 version of consul listens by default on private address ranges, when using IPv6 you'll be running on 'public' addresses. So be sure you're firewalling those from the internet.
  • If you're using consul recursive powers, you'll also need IPv6 dns recursors. (e.g. google's 2001:4860:4860::8888)
  • Not IPv6 related, but for extra stability, enable leave_on_terminate.
  • Also not Ipv6 related, but I've noticed that the default LAN settings for consul can be a bit too strict when running on vmware hosts. This patch increase the probetimeout to 2 seconds (instead of 500msec)


Consul extra configuration server and client

Extra settings below necessary for the consul server and client agent setup


Configuration:
{
        "recursor": "[2001:4860:4860::8888]",
        "leave_on_terminate": true,
        "client_addr": "::",
        "addresses": { "http": "::"}
}

Consul server setup

The consul server are running as a docker host mode container (which means, they share the same network namespace as the host).

The reason here is that we need a fixed IPv6 address for the servers because we're forwarding our dns requests to those servers. (ofcourse with some extra work we could make a script that dynamically update our dns forwards to the dynamic IP address).

Our server has multiple IPv6 addresses so we'll have to add a -advertise and -bind flag

consul agent -server -advertise 2001:db8::1 -bind 2001:db8::1 -bootstrap-expect 3 -retry-join [2001:db8::1]:8301 -retry-join [2001:db8::2]:8301 -retry-join [2001:db8::3]:8301

Using consul-docker as our consul docker container (for client and server)

Consul client setup 

You'll need to cherry-pick this PR into your local build: https://github.com/hashicorp/consul/pull/1219.
The IPv6 address in the docker container will be random and we want to bind to the IPv6 address.
This patch looks for the first 'public' IPv6 address and uses this address to advertise.

So we start the client with:

consul agent -bind :: -join consul.service.consul

Gotcha's here:
bind :: actually binds to IPv4 and IPv6 addresses in the container, but because we advertise the IPv6 address the IPv4 address won't be used.

Other software

Registrator

We also use registrator to register our services in consul. So every time a container starts or stops, registrator handles the consul service registration process.

Also for registrator some extra fixes are needed to have IPv6 support. (not yet merged, see https://github.com/gliderlabs/registrator/pull/229)

Because we're running consul on IPv6 this means registrator also needs to connect to the IPv6 address.

registrator consul://server1.node.consul:8500

Registrator then can register other services that are running on the docker host, like e.g elasticsearch.

Registrator-netfilter

Besides main registrator we also run registrator-netfilter which automatically firewalls the IPv6 services in the container. The containers are no longer NATted but directly accessible, so they need to be firewalled.

Docker

A /64 is allocated for docker and a /80 is given to each docker host, running with the switches

--ipv6=true --fixed-cidr-v6=2001:db8::/80

Elasticsearch

ES is also run ipv6 only, using registrator, registrator-netfilter and consul.
You can find the relevant commands to give to docker below:

docker run --net bridge -e SERVICE_NAME=es -e SERVICE_9200_TAGS=http-data 
-e SERVICE_9300_TAGS=transport-data -e SERVICE_9200_IPV6=tcp -e SERVICE_9300_IPV6=tcp 
-e ADVERTISE_IPV6=yes

Tuesday, February 10, 2015

tmux memory usage on linux


So a while ago I switched from screen to tmux. My reason for switching was that GNU screen didn't work in my docker containers and tmux did ;-)

All was well for a few months and I was replacing screen with tmux everywhere. It did have some other niceties besides working in containers and seem to do its job.

Until


USER       PID %CPU %MEM    VSZ   RSS TTY      STAT START   TIME COMMAND
wim       1660  1.3 12.8 135056 131404 ?       Ss    2014 722:46 tmux -u


Notice anything special above ? Compare it with screen.


USER       PID %CPU %MEM    VSZ   RSS TTY      STAT START   TIME COMMAND
wim      29595  0.0  4.5  48784 46116 ?        Ss    2014   3:49 SCREEN -c mscreen


The tmux session has 8 open windows and 10000 history limit. (set -g history-limit 10000)
The screen session has 39 open windows and 10000 history limit (defscrollback 5000)

So, tmux seems to be using an awful lot of memory. Two times more than screen, for a 'lighter' session setup.

A quick google showed that other people were having the same issues

My first thought was, 'memoryleak', so I checked the code, but everything seemed to be free'd correctly.

I joined the #tmux channel on freenode for some help and got told that it's a specific glibc (linux) issue. Although the memory was free'd, Glibc wasn't releasing it back to the OS.

But you could force it by using malloc_trim(0). And maybe you could use specific glibc environment variables to control memory allocation behaviour to also emulate malloc_trim().

Too much time googling and testing was wasted, I couldn't get it too work, the memory wasn't getting released back to the OS.

So I made a small patch to tmux which
- calls malloc_trim(0) when a window gets destroyed
- also free's memory when you clear your history manually in a window (and also call malloc_trim())

The patch works for me but YMMV

I tried to get this patch into upstream tmux, but was told: 'It's up to glibc to decide how malloc works'.

PS: if you set history-limit 0, tmux actually uses less memory than screen (and doesn't grow), but ofcourse you don't have a scrollback ;-)


Saturday, January 24, 2015

Rancid 3.2 alpha + git


Rancid lovers rejoice, a 3.2 alpha version is released with (at least) 2 interesting features.

- Git support: based on the patch by jcollie.

But with a 'small' difference, not one repository for all the groups, but a repository per group.
Maybe fine if your starting from scratch, but for my situation I like the one repository setup of the original patch.

You can find the latest version with the original setup of one repository for everything, together with some other minor patches on https://github.com/42wim/rancid/commits/mypatches3.1.99

- WLC support: Now you can backup your Cisco Wireless Lan Controllers configuration out of the box. One patch less to maintain. Hurrah!

I'm running Rancid in a Docker setup, so upgrading and testing was quite easy.
No issues found yet with this version.

Tuesday, February 25, 2014

Circumventing IPv6 feature parity: drop AAAA to specific IPs

Unless you've been living under a rock, you'll be aware that IPv6 usage has been increasing.


Yes, it even has come to this: mere mortals can use it at home. The audacity!

Unfortunately not all vendors (if any?) have feature parity, in our case a specific VPN product doesn't support IPv6.
The client will only receive an IPv4 address from the VPN server.

When the user at home starts it's VPN and asks for an internal resource (which also has an IPv6 address), it will try to connect to this resource using the IPv6 from his provider (he didn't receive one from the VPN server) which doesn't work, because this specific resource is firewalled for outside addresses.


Luckily the user has to use our DNS server to look up records (forced to do so by the vpn client)
Luckily we're using PowerDNS recursor which has support for LUA scripting which can modify DNS responses.

The script below gives normal answers to every host not coming from 10.100.0.0/15 or 10.0.0.1/32. Otherwise if the answer contains an AAAA, drop it, and return the rest.


More information about LUA scripting for PowerDNS can be found here: http://doc.powerdns.com/html/recursor-scripting.html